Connecting your Domain
Last updated: October 1, 2026
On this page:
Publish your Website
Step 1: Publish your site to make it accessible online.
From your Corksy admin portal, go to Online Store → Customize
From the Web Builder, you will need to click Publish in the top right corner prior to connecting your domain
Note: If you see Republish in the top right corner of the web builder, your site is already published. You can proceed to Step 2.
Connect your Domain
Step 2: Connect your domain after publishing.
From your Corksy admin portal, go to Settings → Domain Connection
Select Connect existing domain and enter your domain (yourdomain.com)
Note: Do not include "www.", "https://", or any other prefixes
Once you click Save, your CNAME and A Records will be displayed.
Note: Keep this tab open as you will need to copy and paste these records.
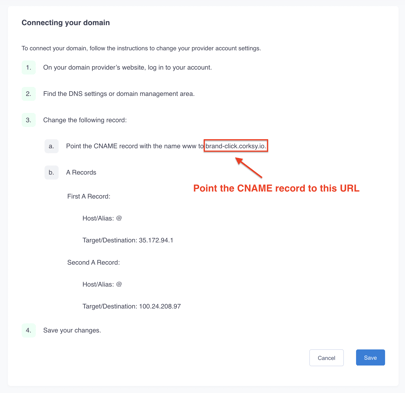
On your domain provider’s website, log in to your account.
Find the DNS settings or domain management area.
Change the following record:
Point the CNAME record with the name www to yourdomain.corksy.io
A Records
First A Record:
Host/Alias: @
Target/Destination: 35.172.94.1
Second A Record:
Host/Alias: @
Target/Destination: 100.24.208.97
Save your changes.
Note: Changes to your domain typically take less than a few hours to go live. However, it may take up to 48 hours.
Need Help?
Log in to your Corksy admin portal, click the question mark icon in the bottom-right corner, and start a conversation with our support team.
Verify your Sender Email
Step 3: Verify your email for sender authentication.
From your Corksy admin portal, go to Settings → Domain Connection
Once your domain is connected, Sender Authentication records will appear in Corksy.
Note: Keep this tab open as you will need to copy and paste these records.
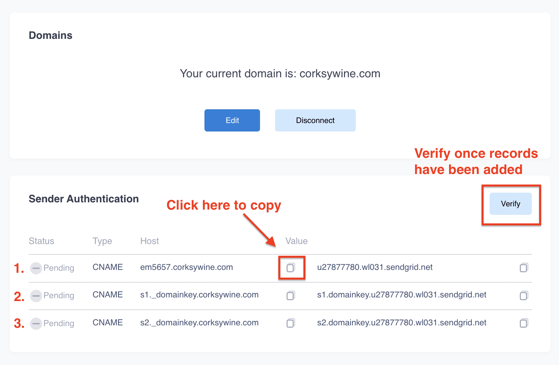
On your domain provider’s website, log in to your account.
Find the DNS settings or domain management area.
Add the following three CNAME records to your DNS settings
Save your changes.
From the Corksy admin portal, to go Settings → Domain Connection
Select Verify

Note: Once completed, your Sender Email will be connected. This ensures your store’s email address appears as the sender for all automated notifications sent to customers and members, such as: “Thank you for your order,” “Thank you for your club sign-up,” and “Your order is on the way.”
Need Help?
Log in to your Corksy admin portal, click the question mark icon in the bottom-right corner, and start a conversation with our support team for help connecting your sender authentication records.
Example Domain Connections
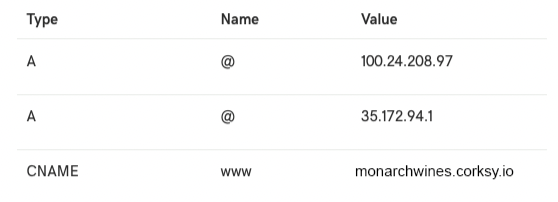
GoDaddy
The following is an example from GoDaddy, in which they use two A records (one for each IP):
Google Domains
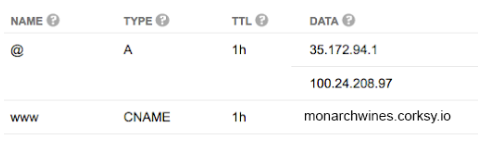
The following is an example from Google Domains, in which they use one A record with two IP addresses:
Note: Changes to your domain typically take less than a few hours to go live. However, it may take up to 48 hours.
Need Help?
Log in to your Corksy admin portal, click the question mark icon in the bottom-right corner, and start a conversation with our support team for help connecting your domain.